

Don’t worry, this post is not about pottery. But as with this craftsmanship, there are elements in applications that need to be thicker or thinner, larger or smaller – for example in terms of capacity or performance. Today, we would like to tell you about a new feature in Azure NetApp Files which enables you to even better shape your volume performance according to your application’s needs.
Azure NetApp Files performance sizing
If you already use Azure NetApp Files, you probably know that the performance of a volume is calculated from the combination of the service level of the capacity pool and the size of the volume.
For example, if you create a volume with a size of 2 TiB in a capacity pool with the Premium service level, you will get 128 MiB/s of throughput. See the documentation on services levels for Azure NetApp Files for further information.

There are applications with different performance requirements, though. For example, an Oracle database comprises of files that are often stored on separate storage volumes with individual needs. Data files and transaction logs are considered hot data and must be processed very quickly. Backup files or archived log files can be stored on less performant storage volumes.
Until recently, you sometimes had to overprovision a storage volume to fulfill performance requirements. For example, if you run an Oracle database and you have about 500 GiB of log files with a required throughput of up to 256 MiB/s, you would need to provision a volume with a capacity of 2 TiB at the Ultra service level to achieve that performance.
What if you had even more flexibility?
The introduction of manual QoS capacity pools gives you more flexibility as it enables you to independently assign the capacity and throughput for a volume . This means that you can now freely distribute the throughput of your capacity pools, which can lead to even more cost savings.
Typical use cases are:
- Databases (Oracle, SQL Server, SAP, SAP HANA)
- Virtual Desktop Infrastructure with user profiles and SMB shares in the same capacity pool
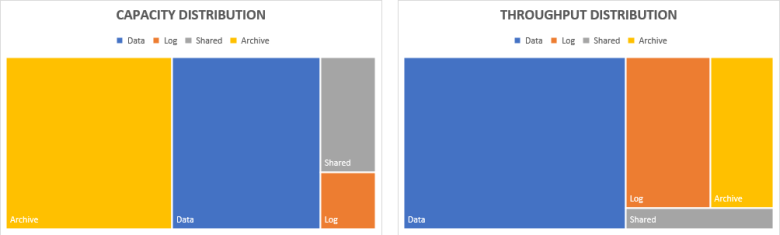
If you create a 10 TiB capacity pool with the Ultra service level, you will get 10 TiB of capacity and 1280 MiB/s of throughput. Since capacity and throughput can be assigned independently, you can implement the following layout for a database running in Azure:
- Data volume with 4 TiB capacity and 768 MiB/s throughput
- Log volume with 0.5 TiB capacity and 256 MiB/s throughput
- Shared / binaries volume with 1 TiB capacity and 64 MiB/s throughput
- Archive / backup volume with 4.5 TiB capacity and 192 MiB/s throughput
In this example, 80% of the total throughput is assigned to less than 50% of the capacity. This avoids overprovisioning of storage resources and reduces cost.
What’s in it for me? Save on cloud spend!
Let’s look at the costs for the performance requirements above. The table below shows the auto Qos and manual QoS volume quotas required to fulfill either the capacity or the performance requirements.
| Volume | Capacity | Performance | Quota (auto QoS) | Quota (manual QoS) | Driver |
|---|---|---|---|---|---|
| Data | 4 TiB | 768 MiB/s | 6 TiB | 4 TiB | Performance |
| Log | 0.5 TiB | 256 MiB/s | 2 TiB | 0.5 TiB | Performance |
| Shared | 1 TiB | 64 MiB/s | 1 TiB | 1 TiB | Capacity |
| Archive | 4.5 TIB | 192 MiB/s | 4.5 TiB | 4.5 TiB | Capacity |
| Total | 10 TiB | 1,280 MiB/s | 13.5 TiB | 10 TiB |
With auto QoS, a capacity pool size of 14 TiB is required to fulfill the capacity and throughput requirements. The monthly cost for a 14 TiB capacity pool with the Ultra service level in West Europe is $ 5,630.32. Source: Azure pricing calculator.
The same capacity and throughput can be achieved with a 10 TiB manual QoS capacity pool. The monthly cost for a 10 TiB capacity pool with the Ultra service level in West Europe is $ 4,021.66.
In this example you will save $ 1,608.66 or almost 30% of your cloud storage cost for the database every month just by utilizing the manual QoS feature.

How does it work?
As of beginning of October 2020 the manual QoS feature is in public preview. If you do not see it in your Azure subscription, follow the documentation on registering the feature.
If you deployed a capacity pool already, you can simply convert it from the auto QoS configuration to manual QoS by selecting the capacity pool and clicking ‘Change QoS type’.

When you deploy a new capacity pool you can select the manual QoS type during pool creation.

Upon new volume creation you can independently set the volume size and the throughput for the volume. In the example below we provide half of the capacity pool’s throughput to a volume that consumes one fourth of the pool’s total capacity.

Limits and caveats
There are a few things that must be considered when using manual QoS capacity pools:
- Converting an auto QoS capacity pool to a manual QoS capacity pool is a permanent change. You cannot convert a manual QoS capacity pool to an auto QoS capacity pool.
- You cannot move a volume from a manual QoS capacity pool to an auto QoS capacity pool using the dynamic service level change feature.
- API calls and PowerShell cmdlets are not available yet because the feature is in preview, but will surely follow once it is generally available.
Summary
In summary, the manual QoS is a great addition to Azure NetApp Files’ rich set of features that enables you to freely distribute the capacity and throughput of your volumes independently and might also reduce your cloud infrastructure costs.
Check out the What’s new in Azure NetApp Files site for more great new features!