

To be honest this is not me on the picture nor have I ever been in a similar situation stuck in a cold, snowy place and hoping someone will pick me up to my destination. But metaphorically this is exactly what I had in mind when writing everything in this article: You know where you want to get to, but the way is not always clear.
So, let’s assume you want to configure Azure NetApp Files for your workload and you do not have a clue where to start. Well, lucky you have found this article which provides you a quick summary of all the things you might want to consider on your “configuration journey”. So, let’ start with a quick look at the items you can configure in Azure NetApp Files:
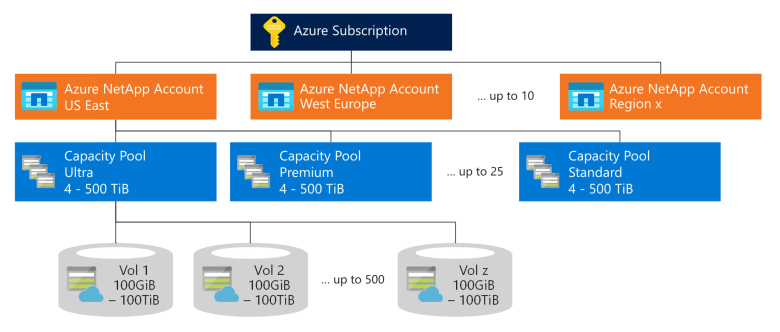
NetApp Account

This is the first item you start with when configuring Azure NetApp Files. Besides the basic information about the Subscription and the Resource group, you define the Location (a.k.a. Region) where you want to configure Azure NetApp Files. All sub-items in the hierarchy (Capacity pools and volumes – both are covered in the later sections) inherit these settings.

So, the first obvious rule of thumb is: Configure at least one NetApp Account per Location/Region where you want to configure Azure NetApp Files.
Besides that, you just have to decide whether you want or have to separate Azure NetApp Files components into different Subscriptions and/or Resource Groups for governance purposes. But keep in mind that a separation into different accounts has effects on the subitems as well and might cause implications which should be considered wisely (e.g. minimum size of capacity pools, overall flexibility by pooling resources, etc.)
Does the NetApp account have any effect on the data placement, data access, or anything else that is directly related to the workload? Not really. So this logical element is just for governance purposes within Azure.
Capacity Pool

The next item in the hierarchy defines how much capacity and performance you want to allocate overall. This is done by specifying the Capacity (4-500TiB) as well as the Service Level (Standard, Premium, Ultra). The costs for this “reservation” are based on the Azure NetApp Files Pricing and allocated to the Resource Group and Subscription from the NetApp Account above.

Similar to NetApp Accounts the Capacity Pools does not have any effect on the data placement or data access. However, they define the overall available capacity, performance, and costs for a workload.
As long as you have requirements <500TiB within a single region you are good to start with one Capacity Pool per required Service Level. This provides the most flexibility. Unless there are certain requirements to split into different pools e.g. for billing or governance purposes. If requirements are >500TiB per Service Level you simply create additional pools.
If you want to configure multiple service levels but have at least one with <4TiB requirement you can think about combining pools. Example: You require 5TiB of Premium and 1TiB of Ultra. Since 2TiB of Premium (2x 64MiB/s) provide the same throughput as 1TiB of Ultra (128MiB/s) you can combine those requirements into a single Premium Pool of 7TiB.
By the way, you can start small and grow as you consume since resizing a Capacity Pool is a simple task.
Volume

The lowest element in the hierarchy is the item that is closest in relationship to the workload or the NFS/SMB clients itself as this is providing the shares and/or exports. Let’s have a look at all categories of configuration items and the things to consider:


- Quota (100GiB-100TiB)
- The size defines the capacity as well as the performance the volume takes from the reserved one in the Capacity Pool. Size according to the workload requirements.
- No worries, the volume can be resized on-the-fly without service interruption.
- Also, movement between Capacity Pools is possible without service interruption.
- Network Placement (VNet + Delegated Subnet)
- Refer to the Guidelines for Azure NetApp Files network planning for the optimal Volume placement.
- Volume placement is just limited by the region specified in the NetApp Account and the availability of Delegated Subnets in the VNets.
- You can place volumes in different VNets that share the same Capacity Pool and/or NetApp Account
- If a single volume does not provide enough performance (>4500MB/s) you always have to possibility to scale out with another volume.
- Protocol Settings (NFS, SMB, Dual-protocol, Kerberos, Export Policies, etc.)
- Each Volume comes with one SMB Share and/or NFS export. If you want more, simply create more volumes.
- Additional Volume Settings (Hide Snapshot path, snapshot policy, etc.)
- Snapshots are powerful for creating point in time records of the volume’s data with minimal overhead. Make use of Snapshot Policies for regular snapshot creation.
Besides these general recommendations, there are more workload-specific designs and configurations available at the Solution architectures using Azure NetApp Files page in the Azure NetApp Files documentation.